
By Dave Poole – Principal Data Engineer
The AWS Well Architected Framework is something that can and should be applied whether you are using a cloud provider or your own data centre. Both Azure and GCP have added their own equivalent frameworks too.
A pillar shared across all three frameworks is “Cost Optimization”. Within this pillar you need to understand: –
- How much the service is costing you
- What aspects of that cost you have some control over
- Options for optimizing your current setup as part of cost management
As Andrew Carnegie said:
“Look after the costs and the profits will look after themselves”.
Even a low-cost service can be expensive if it is heavily used. The trick is to identify where there is a cost saving that can be made and when it is beneficial to make that saving.
Let us take GitHub as an example.
How synvert TCM use GitHub
We use GitHub for source control and GitHub actions for our CI/CD pipelines. We design our pipelines simply enough for this to be appropriate for our ways of working.
Actions are triggered on a few events
- On a schedule (Dependabot and internal equivalent)
- When a GitHub Pull Request takes place
- When a Release Package is published
- …etc
In some cases, such as for Dependabot Pull Requests, no human interaction takes place. Dependabot does the following: –
- Identifies the need to upgrade a library
- Applies the upgrade considering any versioning dependency rules
- Generates a pull request which will auto-approve and merge into the trunk if all tests pass successfully.
So where does cost control come into this.
Looking at GitHub workflow costs
Let us start by navigating GitHub in one of our repositories.
From the GitHub toolbar in a repository, we do the following: –
- Choose “Actions” (shown circled in RED)
- Choose a workflow
This reveals a screenshot like the one below:
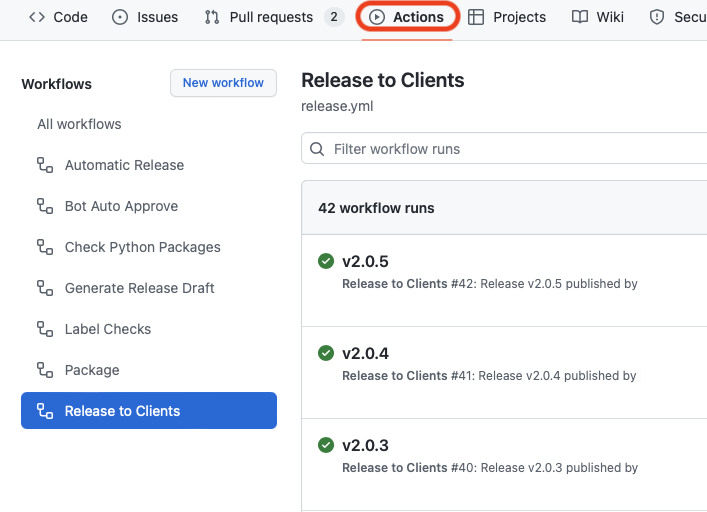
If we click on the “Release to Clients” workflow and choose a workflow run we receive a graphical representation of the jobs and dependencies in our workflow.
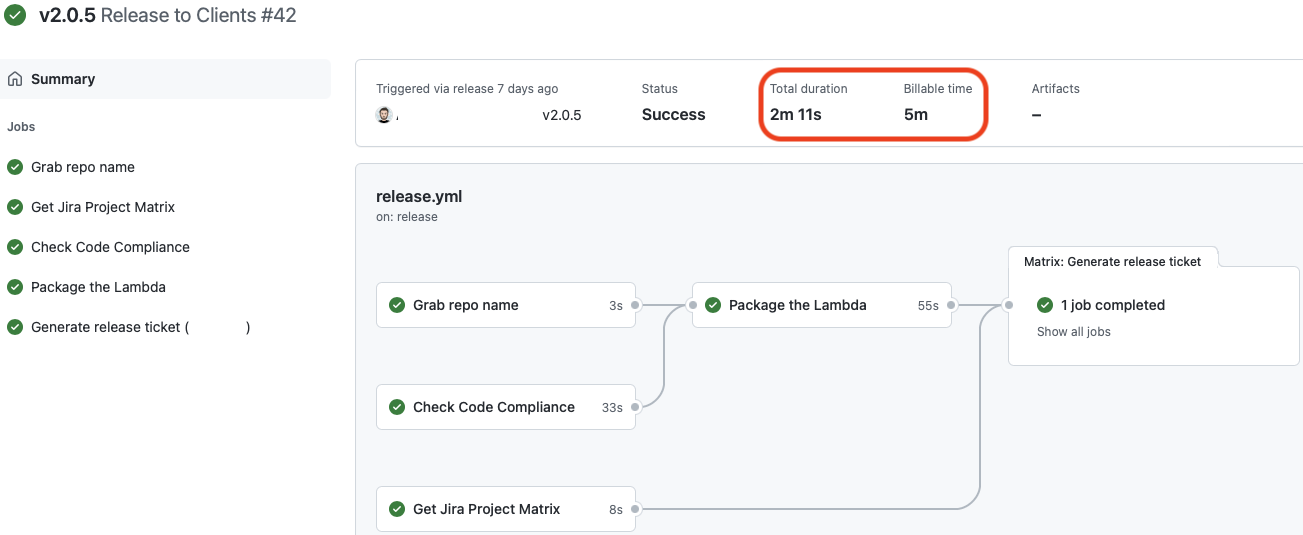
Circled in RED are the duration and billable time. Notice that we are billed for more than twice the duration!
Click on either the duration or billable time and you will receive a more detailed breakdown of what time was spent and where the costs accrued.
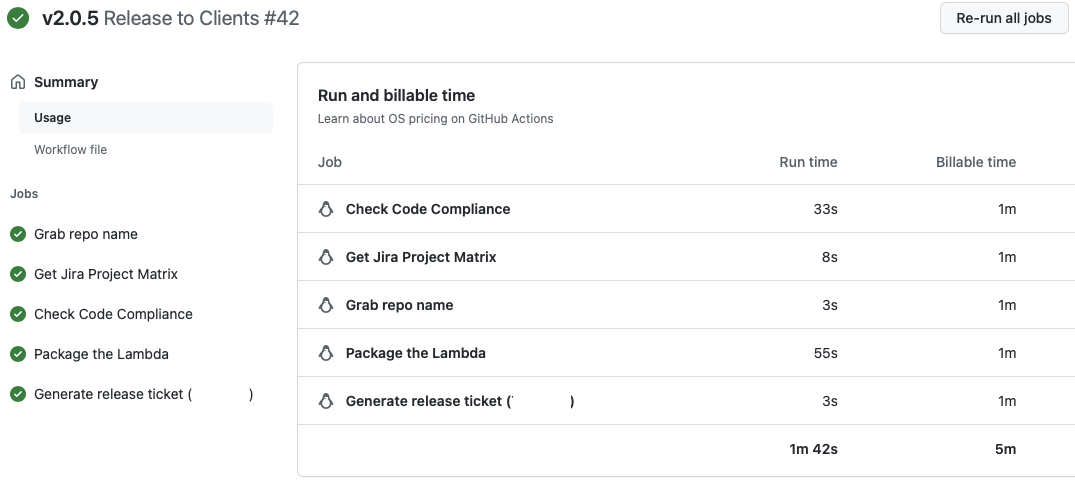
We can see that each step in the workflow is billed rounding up to the nearest minute. Even though three of those steps are single-digit seconds!
Consolidating the workflow jobs
When we build a GitHub workflow we think carefully about several things
- Orchestration. What runs in what order, adjacent to or dependent on what?
- Readability of workflow code.
- Separation of concerns. Organising tasks into logical “job” units.
- Adding functionality when adjusting stable old workflows
- Fail fast. Whether there are jobs where a failure can terminate the workflow at the earliest possible point.
The intent of two of the short-lived jobs in the example workflow was to cater for the latter scenario.
As an engineer, I do not want to have a long-running pipeline that ends up failing after several minutes run. It is a huge waste of time and breaks my flow and concentration.
Whether jobs could or should be run in parallel is a trade-off.
- Cost of engineer time
- Cost of execution time
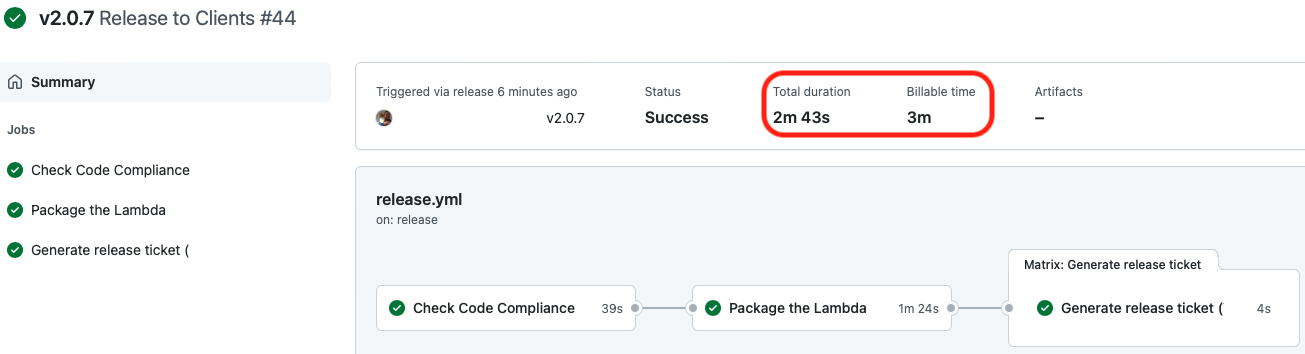
In our example, there is no engineer time advantage to running the functionality represented by “Get Jira Project Matrix” and “Grab repo name” adjacent to each other. There is a cost of execution time benefit in merging their functionality into the other steps.
- “Grab repo name” merges into “Check Code Compliance”
- “Get Jira Project Matrix” merges into “Generate release ticket”
The results of doing so are shown in the screenshot below. Billable time has been reduced towards the duration of the job.
If we amalgamate jobs then some trade-offs we must consider are shown below:
| Benefit | Cost |
|---|---|
| Fewer job start-up/tear-down operations | Reduced parallelism |
| Potential elimination of duplicate processes such as Code checkout | Potential slower overall execution |
| Reduced billable time | Reduced readability / clarity of purpose |
| Longer re-runs (if required) |
Traps when using GitHub matrix functionality
When we publish an application release we want a JIRA ticket generated to cover the deployment of that new release to all clients using that application. By using a GitHub matrix, we can loop through a list of clients executing the “Generate release ticket” job for each one. The use of a GitHub matrix aids the clarity and simplicity of the workflow.
However, each execution of the job will count as a separate job with its own billable time rounded up to the nearest minute.
In the workflow above “Generate release ticket” takes about 4 seconds. If the application is used by 15 clients then each execution of the job will be charged at 1-minute billable time.
15 minutes billable time for 1 minute duration!
Depending on what we wish to execute inside of a loop we may prefer not to use a matrix and rely on our own script
Again, we must consider the trade-offs if we decide to implement our own code.
| Benefit | Cost |
|---|---|
| Reduced billable time | Workflow logic no longer visible in a single place |
| Greater flexibility and functionality | Build vs Buy |
Cost of using Dependabot
We use Dependabot to keep libraries and frameworks patched and up to date.
We patch for the following:-
- Security
- Features
- Performance improvements
- Dependency requirements from other packages
The question we must consider is how often our business use case demands that we apply patches. Whenever Dependabot upgrades a library it creates a GitHub pull request. In doing so it will trigger all the GitHub actions associated with a pull request and incur billable time.
Libraries such as boto3 are updated frequently; 21 releases in July 2022. So Dependabot can result in a lot of activity. In many cases the changes are not relevant to our use of boto3.
The simplest solution is to reduce the frequency of Dependabot runs. Some trade-offs are listed below.
| Benefit | Cost |
|---|---|
| Patch frequency more closely aligned with business release cycle | Visibility of emergency patches and CVEs needed |
| Fewer runs thus lower cost | Emergency security patches may be applied later than ideal |
| Less contention for resources by applying frequent updates | May skip library versions making version specific changes harder to identify |
Another solution is to use the open-source combine-prs-workflow to bring Dependabot updates into a single branch to merge into your trunk.
Cost of failed workflows
Failures in a workflow can occur for several reasons:
- Code linting problems
- Test failures
- Cloud service availability
As mentioned earlier, a failing workflow will interrupt the flow and concentration of an engineer and incur costs for no productive output.
We can do little for problems caused by cloud service availability however the reliability of such services tends to be high.
If we run linting and testing locally then we can reduce workflow failures due to these issues. This also gives us quicker feedback due to the greater power of our workstations:
- Lint/Test problems locally tell us how to succeed
- Lint/Test problems in a pipeline tell us that we failed
We still need the pipeline linters and test suite execution. Not all tests can be run from a workstation. However, libraries such as moto and the botocore stubber allow us to run the majority of our integration tests.
Tools such as pre-commit allow us to execute linters and code formatters when we git commit. If the configuration of the pre-commit hooks matches that used for the CI/CD pipeline we can eliminate failure due to linting issues.
Enjoy this blog? Check out our other blogs to learn more.